[cs_content][cs_section bg_image=”https://bikegraphix.com/wp-content/uploads/2016/01/test.jpg” parallax=”false” separator_top_type=”none” separator_top_height=”50px” separator_top_angle_point=”50″ separator_bottom_type=”none” separator_bottom_height=”50px” separator_bottom_angle_point=”50″ style=”margin: 0px;padding: 45px 0px;”][cs_row inner_container=”false” marginless_columns=”false” style=”margin: 0px auto;padding: 0px;”][cs_column fade=”false” fade_animation=”in” fade_animation_offset=”45px” fade_duration=”750″ type=”1/1″ style=”padding: 0px;”] [/cs_column][/cs_row][/cs_section][cs_section parallax=”false” separator_top_type=”none” separator_top_height=”50px” separator_top_angle_point=”50″ separator_bottom_type=”none” separator_bottom_height=”50px” separator_bottom_angle_point=”50″ style=”margin: 0px;padding: 0px 0px 45px;”][cs_row inner_container=”true” marginless_columns=”false” style=”margin: 0px auto;padding: 0px;”][cs_column fade=”false” fade_animation=”in” fade_animation_offset=”45px” fade_duration=”750″ type=”1/1″ style=”padding: 0px;”][x_custom_headline level=”h1″ looks_like=”h3″ accent=”false” class=”cs-ta-center”]How To Apply Number Plate Graphics[/x_custom_headline][x_video_embed no_container=”false” type=”16:9″]
How To Apply Number Plate Backgrounds and Graphics
Before you start
Inspect your plastics, if they are scuffed and scratched or have major damage it may be worth looking at replacing them. Before applying motocross graphics kit your dirt bike plastics need to be in a reasonable / excellent condition.
For installation you will need:
– xacto knife / scissors;
– hair dryer or heat gun;
– degreasing agent or alcohol-water mixture;
– squeegee
Wash your hands. It is very important to have clean hands while you are preparing surface and working with graphics. Oily / dirty hands will reduce the ability of your graphics to adhere.
Preparing surface
Remove old graphics. You can use hair dryer or heat gun to warm the old graphics for easy removal. Clean the surface with degreasing agent. You do not want to leave any glue residue from the old graphics, oils or dirt. Your dirt bike plastics should be warm before applying graphics. We recommend you to keep plastics in a room with temperature more than 60 ºF for several hours.
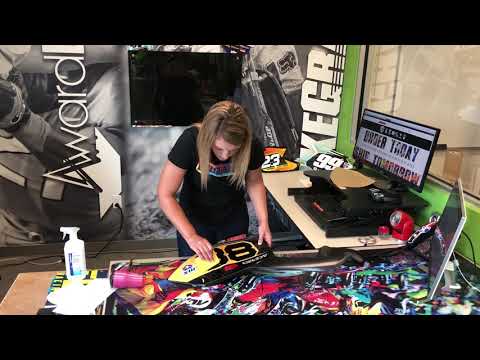
Applying graphics (watch video)
Peel the backing paper away from the background until it is completely removed. Place your decal over the plastic (e.g. number plate) and line up the bolt holes. Re-check your alignment on the part to be covered. Touch one side of the graphic with your finger to place it.
Working in small sections, use your thumb (or squeegee) to apply pressure to the graphic being careful not to get any wrinkles or bubbles. You have to work from the center out. If you get bubbles, carefully peel the section up and try again. Use the safety pin to pop any small air bubbles. Then smooth out the bubble section moving towards the edges of the graphic. Repeat process to the other side of the same decal.
If you have sharp curves in your plastic (e.g. number plate over exhaust pipe), use heat gun to heat the graphics so they are more pliable. Be careful not to overheat!
If needed – cut off excessive sections or sections of the graphics that are covering bolts, access holes, or vent slits – we suggest to use an xacto knife.
Installation tips
Take your time and be patient!
For several hours before installation, keep your dirt bike or plastics in place with temperature more than 60 ºF for several hours.
Wait at least 24 hours before riding to make sure proper bonding is achieved.[/cs_text][/cs_column][/cs_row][/cs_section][/cs_content]